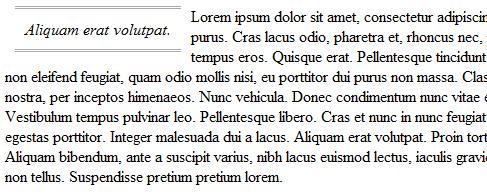
When i talk about WordPress you all know that i prefer doing something by hand rather install a plugin to do it – provided that the task at hand is easy to do. I have already shown you how to get rid of the various sociable plugins and do it yourself easily through some php and css tweaking. Here i am about to show you how to easily add paragraph sidenotes. I first saw the usage of sidenotes on WordPress on the blog of my dear friend Mike Nichols. I have no idea if he does it by hand or has a plugin do it for him. In general, sidenotes make a large text much more easier to read and grab the concept. When going through large chunks of text with so much info on them it’s a good thing to have a phrase that summarizes what will be discussed in the next few lines. The process we will follow is pretty simple. We will tweak a little our theme’s CSS and that’s about it. Then adding a sidenote will be as easy as wrapping it with a div. Here is an example output:

Let’s get down to business. We are going to have every sidenote appear floating left of our paragraph. Here is the CSS block that will do just that:
div.sidenote {
	float: left;
	border-top: double #aaa;
	border-bottom: double #aaa;
	font-style: italic;
	margin: 0px 10px;
	padding: 10px;
}
Pretty easy huh? You can customize that in any way you want. This is just a common way of a sidenote to appear. Now, all we need to do is start writing! And when we need a paragraph with a sidenote we can have the sidenote wrapped around a div with the class “sidenote“. Here is how:
<div class="sidenote">This is a sidenote to a paragraph</div>
This div can be put anywhere in our posts. It will look better if it’s on the beginning of a paragraph (<p>). Now you will probably want your sidenotes scattered left and right and not only left. This can also be done easily by creating two sidenote blocks in the CSS like this:
div.sidenote-left {

	float: left;
	border-top: double #aaa;
	border-bottom: double #aaa;
	font-style: italic;
	margin: 0px 10px;
	padding: 10px;
}
div.sidenote-right {
	float: right;
	border-top: double #aaa;
	border-bottom: double #aaa;
	font-style: italic;
	margin: 0px 10px;
	padding: 10px;
}
Notice that the only difference is the float property. Now, in our div for a left sidenote we can do:
<div class="sidenote-left">This is a sidenote to a paragraph</div>
And for a right:
<div class="sidenote-right">This is a sidenote to a paragraph</div>
I was exhaustive on this one because i wanted to make it perfectly clear and easy to anyone reading this post. Still, if you have any problems feel free to comment and let me know. Happy writing!
Another great tutorial! Thanks – I’m already thinking of how I could use this.
@Kim: I hope it turns out to be useful to you! Thanks for dropping by!
Superb tutorial!! I will surely try it out soon. It would have been better if you had used the sidenote yourself in the tutorial as a live example!
@Raju: Well i know but it would need some customization and i am a lazyass in general 🙂 If you need any help let me know 😉
Hey Raju, this was the 1000th comment made to this blog! Thanks to all the readers and commenters!
I am a noob when it comes to CSS, PHP so editing the themes/appearances wasn’t really my cup of tea. I normally resort to using plugins.
You got some good tutorials here, and it will definitely help me reduce my dependency on plugins.
Thanks for posting.
@Devakishor: Well i know what you mean man. This is why i did this one extra simple. I hope you got how to do it. If it is unclear though let me know and i will be glad to help you out!
nice tutorial dude …
it takes gr8 mind to come up with simple things … and this is wonderful .. gr8 job
@Ranjeet: Thanks for stopping by man. I hope it turns out to be useful to you at some point or another…